Tutorials
These tutorials present how to use Quepid from a few different perspectives. While the concepts are the same, how Quepid is used and the features that are used differ between the perspectives. These tutorials walk you through how to use Quepid most effectively based on your role as either someone who is providing human judgments (ratings) on search results, or as a search relevance engineer using those judgments in search relevancy experiments, or for managing Quepid operations behind the scenes to manage queries and teams.
What is Quepid?
Before we jump into the tutorials, what exactly is Quepid? Quepid is a tool to help you improve your organization's search results. It is a web-based application and can either be used at app.quepid.com or it can be installed on your own hardware. Quepid makes improving your app's search results a repeatable, reliable engineering process that the whole team can understand.
Quepid was created and designed to address three pain-points often experienced during search relevancy improvement:
- Collaboration - "Our collaboration stinks!" Making holistic progress on search requires deep, cross-functional collaboration. Sending emails between teams or tracking search requirements in spreadsheets won't provide the improvements required. Quepid provides a centralized user interface for tracking cases, queries, and the judgments given to search results. Quepid's team management provides the ability to organize users into teams along with their associated cases and custom scorers.
- Testing - "Search testing is hard!" Yes, it is and search changes are cross-cutting and a lot of changes will cause problems. Testing is difficult because you can't run hundreds of searches after every relevance change. Quepid organizes your test efforts into cases and queries and gives you the ability to "tune relevance" by modifying your search query. Quepid allows you to quickly re-run your queries after experiments to immediately see the impact on the value of your chosen scorer providing feedback on your experiments.
- Experimentation - "Iterations are slow!" Many organizations simply give up on search due to long experiment iteration, often depriving users of the means to find critical information. If it takes weeks, or in some cases even days, to perform an experiment, organizations will tend to pivot away from experiments. Quepid works to address this common pain-point by combining an easy-to-use user interface with the features and capabilities needed to increase your experimentation throughput.
Now that we are familiar with Quepid's purpose and the search relevance pain-points it was designed to alleviate, let's get into the tutorials!
Quepid for Human Raters
In this tutorial you will learn how Quepid can be used by humans to make judgments of search results. Human judgments are useful, and often required, to accurately and effectively measure search. Using the judgments we can measure how we are improving search over time. We will access Quepid, connect to our organization's Solr or Elasticsearch, run queries, and label the search results with our judgments. We recognize that making human judgments requires time and focus, so Quepid was designed to have an easy-to-use interface to make it as easy as possible.
Connecting to Quepid
Quepid can be accessed at app.quepid.com or it can be self-hosted. For this tutorial we will be using the hosted version freely available to everyone. You will want to run a self-hosted Quepid to connect to Solr or Elasticsearch instances behind firewalls, when a search middle layer is involved, or any other time it is required. See the documentation to learn how to run Quepid self-hosted.
Creating a New Case
A "case" refers to all of the queries and relevance tuning settings for a single search engine. For example, if we are running a movie rental store and we want to improve our "Star Wars" search results, we may create a new case and call it "star wars." Under this case we will perform our searches and provide our judgments.
See it in action! Creating a new case in Quepid.
After accessing Quepid, create a Quepid account or sign in with an existing social account. Once logged in you will see Quepid's main screen. You don't yet have any cases so nothing will be shown. A new case can be created by clicking the Relevancy Cases menu and clicking the Create a case button.
To create a case, click the Relevancy Cases menu at the top and click Create a case.
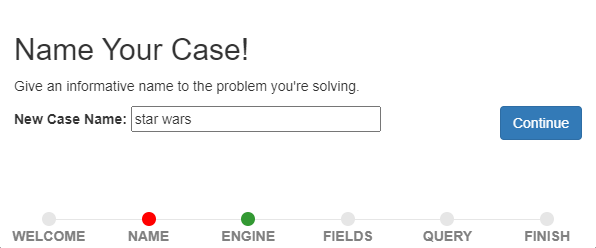
The first piece of information we are asked to provide is a name for the case. Enter "star wars" and
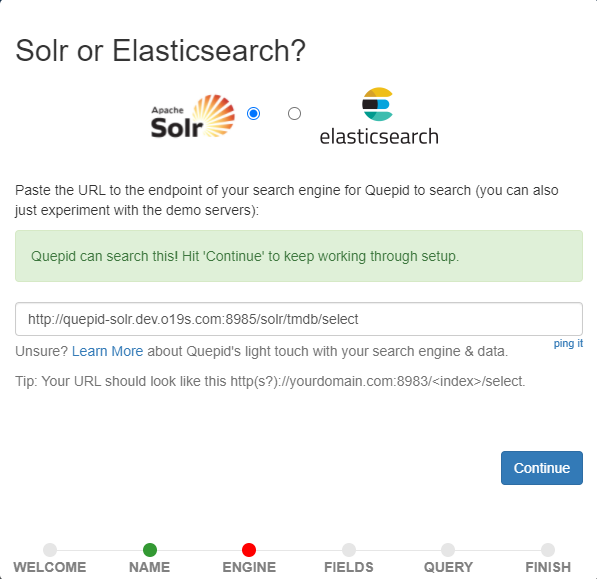
click Continue. Now, you are asked to provide the location of your Solr or Elasticsearch
instance.
If you do not have this information contact your organization's infrastructure team and ask for the
Solr or Elasticsearch URL. The URL should look something like http://our-search.movies.com:8983/solr/movies/select.
Click the ping it link to verify the connection works. Once connected, click the Continue button to proceed.
How does Quepid connect to my Solr or Elasticsearch?
The version of Quepid available to everyone at app.quepid
.com
actually runs inside your web browser. When you connect to Solr or Elasticsearch from Quepid the
connection is made from your computer, and not a server somewhere on the internet. For example,
if you are running Solr on your own computer, you can connect to it from Quepid using the
address http://localhost:8983/solr/movies/select.
Query Fields to Display
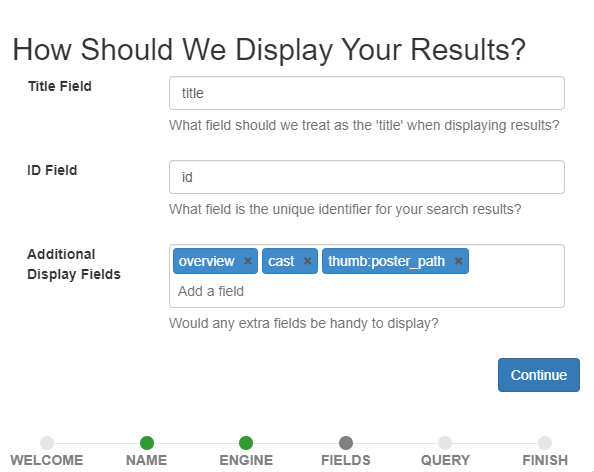
Now you will be asked for some fields in your search results. This information is determined by how your data is indexed in your search engine. If you don't have or know this information check with your infrastructure team. The information provided here will control how Quepid displays the search results for rating. The field specified by the Title Field will be shown in bold in the search results. For a search index of movies, you probably want this field to be the title of the movie. The ID field is the unique identifier for each document in your index. Quepid uses the value of this field to uniquely identify each document in the search results.
The Additional Display Fields allows you to specify a list of other fields whose values will be shown in Quepid's search results. You can use these fields to provide information about each document to help you provide a judgment on its document. For example, to provide human judgments for a movies search engine, it may be helpful to know the overview of the movie, the cast members, director, or tagline. It can be difficult to judge a movie's relevance to a search query based only on the movie's title. The movie title "Independence Day" doesn't tell us anything about aliens attacking Earth but with the movie's overview and tagline we know more about the content of the movie. Once you have the fields configured click the Continue button.
Queries
Now we are ready to add our search queries! You can add as many queries as you need to. These are the queries for which you will be judging the search results. If you are not sure what queries to add, check with your search engineering team. In this tutorial we will add two queries: star wars and star trek. Once those are added click the Continue button. That is all the information we need to provide so click the Finish button.

Viewing the Query Search Results
Quepid will now connect to your Solr or Elasticsearch instance, run the queries we added, and display the queries. We can see our two queries star wars and star trek. We can see that the star wars query returned 2477 results and the star trek query returned 2316 results. (Your numbers may vary and matching numbers are not important.) The frog icon indicates there are search results for a query that have not yet been assigned judgments. We see the frog for both queries because these are brand new queries with no judgments.
See Quepid in action!
Making Binary Judgments
Let's start with the star wars query by clicking it. The list of movies matching the star
wars query will be shown. To the left of each movie search result is a gray box. We use this box
provide a relevance judgment for each movie. Click the Select Scorer link and click
P@10. This allows us to make a binary judgment on each search result and label each
as either relevant (1) or not relevant (0). Now, for each search result,
look at
the
fields
returned (that we selected when we created the case) and click the gray box. If you think this search result is relevant to the query click
Relevant. Otherwise, click Irrelevant.

Congratulations! You have just provided a human judgment to a search result! In the next section we will look at making judgments on a graded scale. As opposed to simply evaluating individual document results with a simple binary grade of 0 to mean irrelevant or 1 to mean relevant, sometimes it makes sense to allow for grading results from a grade of 0 to mean strongly irrelevant, all the way up to 3 to mean perfectly relevant, so that you can also grade 1 or 2 for documents that are not as strongly relevant or irrelevant. There is also the option to have an even finer grain grading scale which goes from 0 to 10, allowing more subtle differentiations as to what extent documents are relevant as compared with other documents that appear in the result set that might be still somewhat relevant, but more so or less so.
Making Graded Judgments
As you probably know, search relevancy is
often not a binary decision. Sometimes one result is more relevant than another result. We want to
see
the
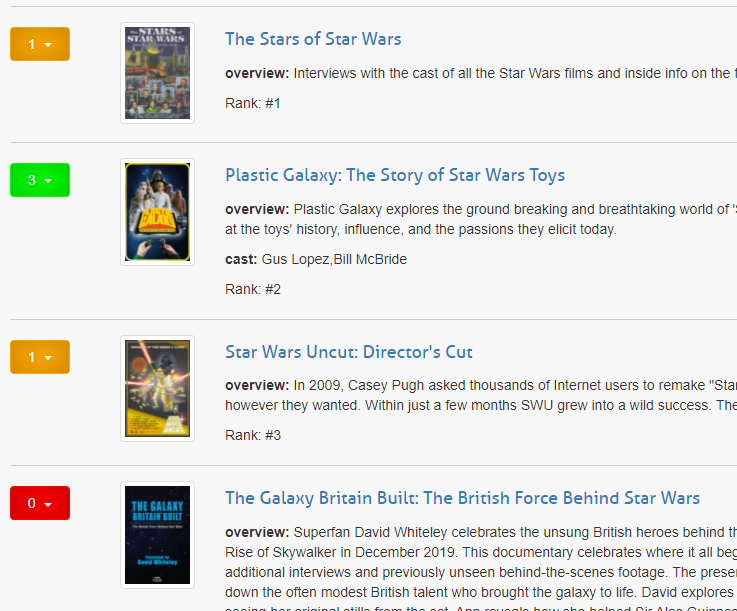
movie "Star Wars" returned above "Plastic Galaxy: The Story of Star Wars Toys." Both movies are
relevant, but the former is more relevant. Click the Select Scorer link and select the
DCG@10 option and click the Select Scorer button. With this scorer selected we can
judge our search results on a scale of 0 (poor) to 3 (perfect).

Look at the title and overview of the first search result. Is this movie relevant for the query star wars? Click the gray box by the movie and make your selection. Is it a poor match, a perfect match, or somewhere in between? There is likely no correct answer - two people may give different answers and that's ok. What's important is that you take your time and provide your judgments consistently across queries and search results.
Who is keeping score?
As you assign judgments, you will likely notice the score at the top left of the page changes. It's important to remember you are not trying to get a high score, a low score, or any particular score. For our efforts as a rater we are not at all concerned about a score. The search relevance engineers will know what to do with the score! Just remember, it is not your goal or responsibility to have any influence on the score. The score is not a reflection of your efforts.
How many search results should be judged?
The number of search results you should judge depends on a few factors and your organization's search team can provide guidance. As a general rule of thumb, 100 judgments (10 pages of 10 search results) is a good starting point and likely sufficient for most cases.
Conclusion
There is a lot more to Quepid, but from the perspective of someone who just needs to use it to provide human judgments of search results you do not need to worry about the other features but feel free to explore Quepid's user interface and other features!
Quepid for Search Relevance Engineers
Getting Started
We will assume that you already have Quepid configured such that it can connect to your instance of Solr or Elasticsearch. If not, refer to the Quepid documentation for configuring Quepid. We will also assume that you have human judgments in a saved Quepid snapshot. With these things we are ready to work on our search relevance!
Go to Quepid and open the case you want to work on. The list of queries will be shown and
clicking on a query will show the search results for that query along with the human judgments
and the score for the chosen search metric. With this baseline we can work to tune our search to
improve the relevance of the search results. Click the Tune Relevance link to open the side
window where you can adjust the parameters of the search. The first tab in this window is the
Query tab. In this tab you have full control over the query that is sent to Solr or
Elasticsearch. By default, the query is simply q=#$query##, which tells Quepid to
take the search term(s) for this query and put it where the #query## is. That's the
search. It's not surprising our initial search results probably were not as relevant as they
could be!
You have all the tools of your search engine at your disposal through the Query tab. You can apply boosts, set match options, specify fields, and more. As you make changes to the query and experiment with different queries, it can be helpful to make notes about what you are changing. You can use the Annotations tab to capture freetext notes about your changes. Use the annotations to help you remember what you have tried, what worked, and what didn't work. It may not seem helpful at the time but being able to look back at your changes and have an immediate understanding of the changes can be immensely helpful in the future.
After making changes to the query, click the Rerun my searches! button at the bottom of the window to run the searches again but this time with the updated query. After the new searches run, the search metric score will update based on the changes in the search results. You may have made changes to your query and now there are new documents in the search results that were not present during the human judgments process and therefore have not been assigned a judgment. (The frog icon for each search will quickly alert you when a query has results without judgments.) If this is the case, you need to alert your teammate or appropriate team to let them know there are new search results that need judged. (If this is a task in which you are responsible for providing the human judgments and also for tuning the relevance then you can simply give judgments to the new results and continue on.
Working with Snapshots
After changes to the query have been made and you are at a point where you would like to record your progress, click the Create snapshot link. Having snapshots available as you work will allow you to compare your progress over time. Is your search relevancy improving, is it declining? Snapshots will provide you with that knowledge.
To compare snapshots, click the Compare snapshots link. In the window that is shown, select the snapshot you want to compare against and click the Update diff settings button . Quepid will update the search results to show both sets to show the current search results against the previous snapshot. Snapshot comparison is a powerful tool for quickly visualizing the difference in your queries and will assist in your future search tuning efforts. The comparison of the search metrics between these two snapshots provides feedback to the search team! The snapshots can be used to measure progress over time as your search team works to improve your organization's search relevance.
To stop comparing snapshots, click the Compare snapshots link and select the Disabled option and click the Update diff settings button.
Tuning Relevance
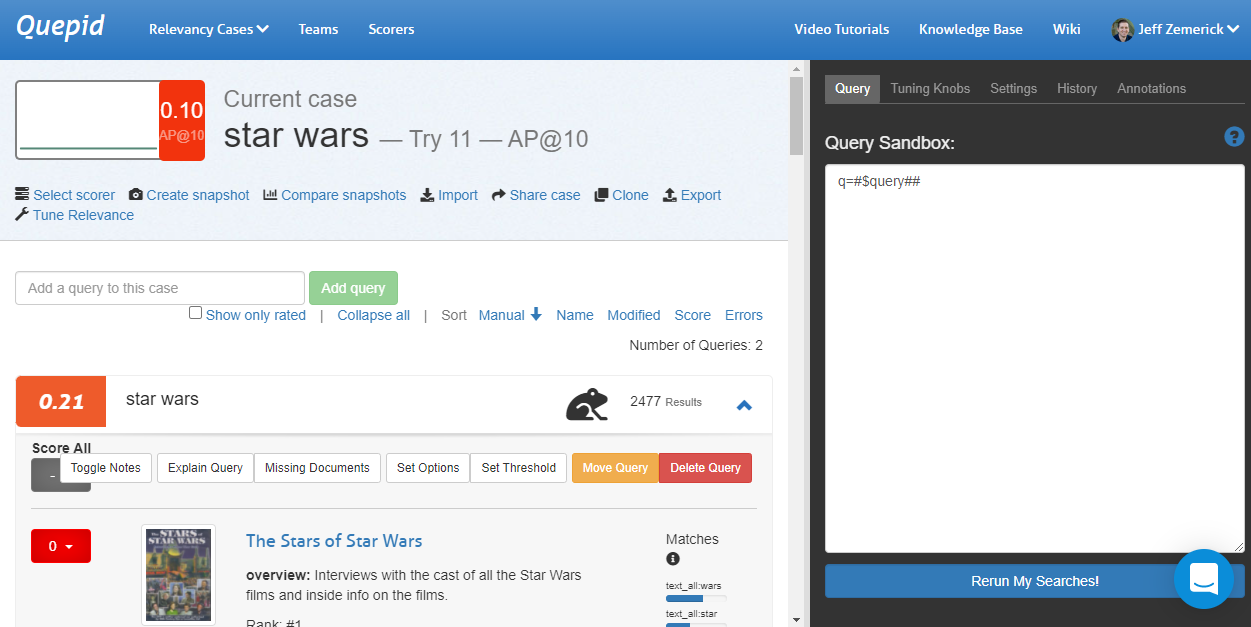
Now let's do some search tuning! Our star wars query returns movies that are at
least somewhat related to the Star Wars movies but we are probably wanting to see the actual
Star Wars movies first instead of movies such as "The Stars of Star Wars" and "Plastic Galaxy:
The Story of Star Wars Toys." So let's do some tuning to see if we can improve our search
results.
We are using the AP@10 scorer. With our human judgments, our score for the current query is 0.21. Click the Tune Relevance link to open the side window and the Query tab.
Let's use our search engineering knowledge to improve our query's score! Improving our search is
heavily
an experimental and iterative process. We may try some things that work and some things that don't
work and
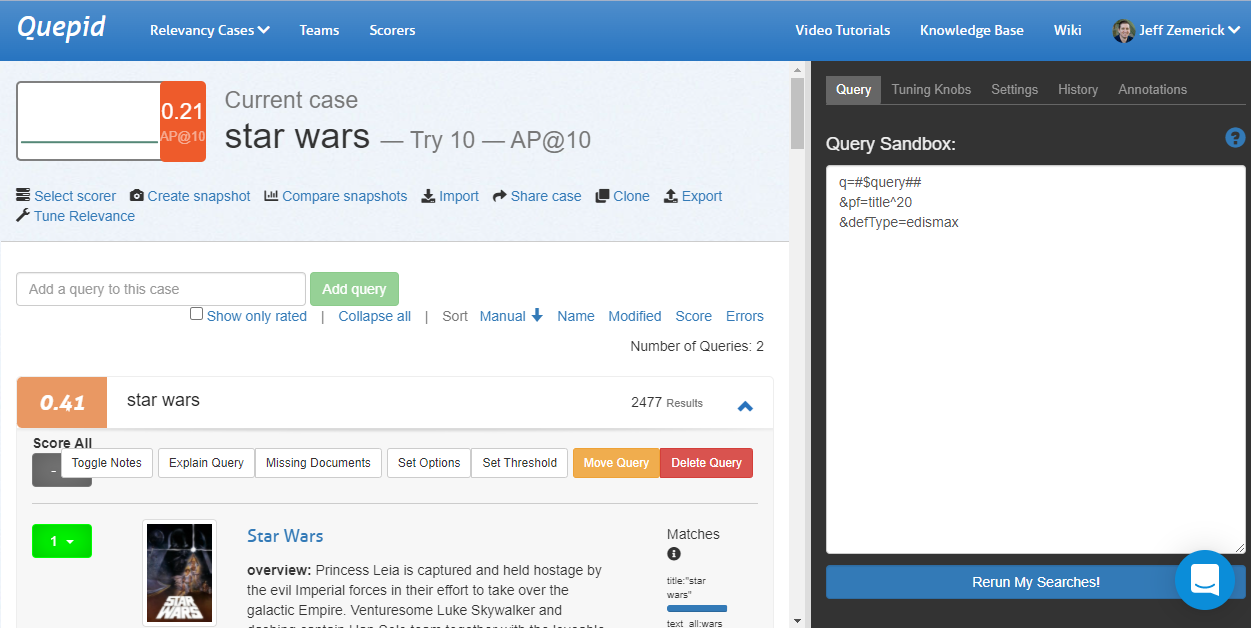
that's ok! We can learn from what doesn't work in our iterations. To start, let's change our
search to use phrase fields pf to boost results where the search query (star wars)
appears in the title. We'll also use edismax. Now, our query looks like:
q=#$query##&pf=title^20&defType=edismax
Click the Rerun My Searches button to run our new query. Let's look at our search results now. The first result is the movie Star Wars so that's great and an obvious improvement! The AP@10 score has increased to 0.41. The second movie is "Star Wars Spoofs" and "Battle Star Wars." Are those movies what our searchers want to see? Probably not. The other Star Wars movies would be better results.
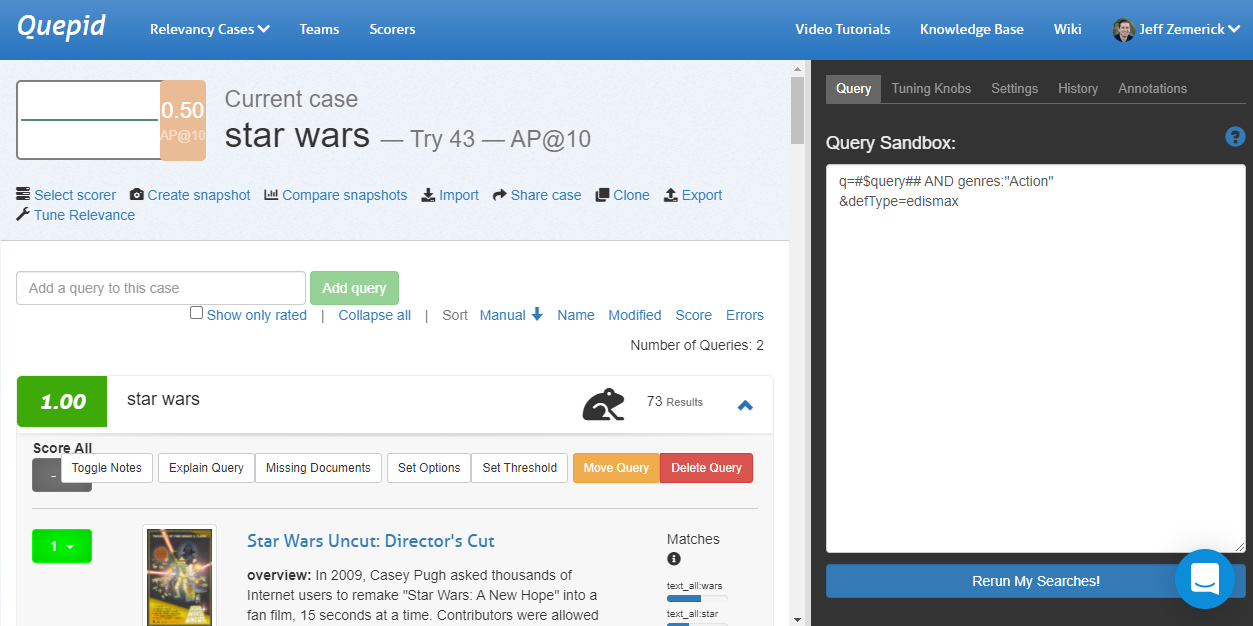
Let's iterate on
our query and see if we can improve some more. What should we try? Maybe there are other fields
in our schema that we could be using. The TMDB database has a genres field
that contains a list of genres for each movie. We can try restricting our search results to
just action movies using the genres field. This will help remove some of the
irrelevant movies from the search results.
q=#$query## AND genres:"Action"&defType=edismax
This provides a huge gain in our score although we might have a few frogs indicating there are new results that have not been judged. Will we always know the user is searching for action movies? Maybe, maybe not - it depends on your use-case. This is just an example of how we can use Quepid to iterate on our queries.
Scorers
A scorer refers to the scale used to rate query results. Quepid comes with several common relevance scorers such as AP, CG, DCG, and NDCG. Additionally, users can create custom scorers and share those scorers with teams. To access the scorers click the Scorers link at the top of any page.

On the scorers page, click the Communal tab to show only the scorers that are available to all users of Quepid. Click the Custom tab to show only scorers that you have created and shared with a team. To create a new scorer, click the Add New button. The New Scorer window will be shown.
Why would you create a custom scorer?
It is impossible to create a universal pre-set list of scorers that will apply to every possible use-case for search. Each organization's search system is going to be a unique case with a unique set of data and a unique set of requirements for what success looks like for the people using the system, and so it is likely that each organization's search team will need to be able to measure the quality of their results by a unique set of scorers, and quite possibly create one or more custom scorers that act differently than any of the default scorers do. It is for this reason that Quepid provides the ability for you to create a custom scorer. The most common scenario for needing to do so is because you need an @k scorer that isn't @10.
Tip! In the case of a custom @k scorer, you can simply clone the default @10 scorer and then update the k parameter.

First, give your scorer a name. Next, you can enter the JavaScript code for your scorer. Refer to Creating a Custom Scorer to learn more about the code requirements. Next, choose the scale for the scorer. Finally, you can optionally provide labels for the scale by clicking the Show Scale Labels option. When finished, click the Create button to create the scorer.
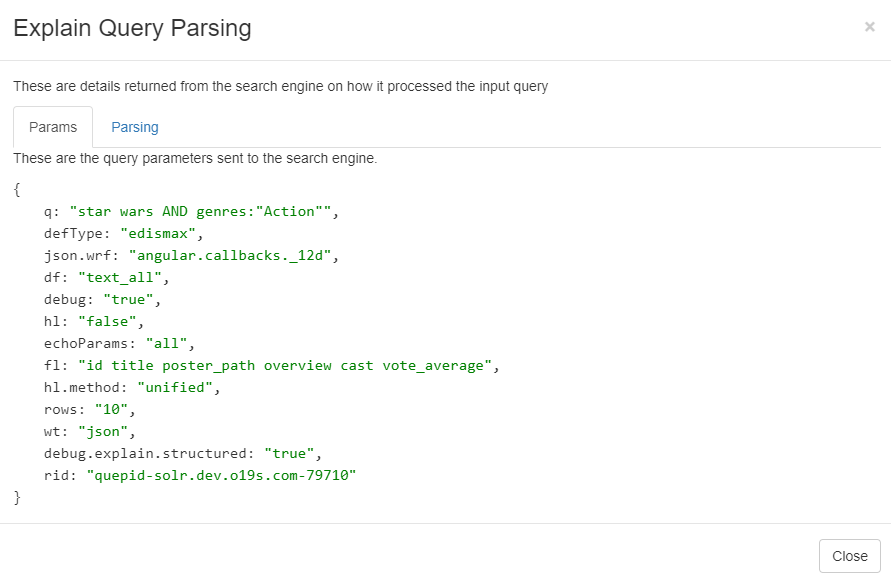
Viewing Query Explanation
It can be helpful to view an explanation of the query. Clicking the Explain Query button will open a window showing the query explanation. The explanation gives insight into how the query parameters and how the query was parsed.
Rating Missing Documents
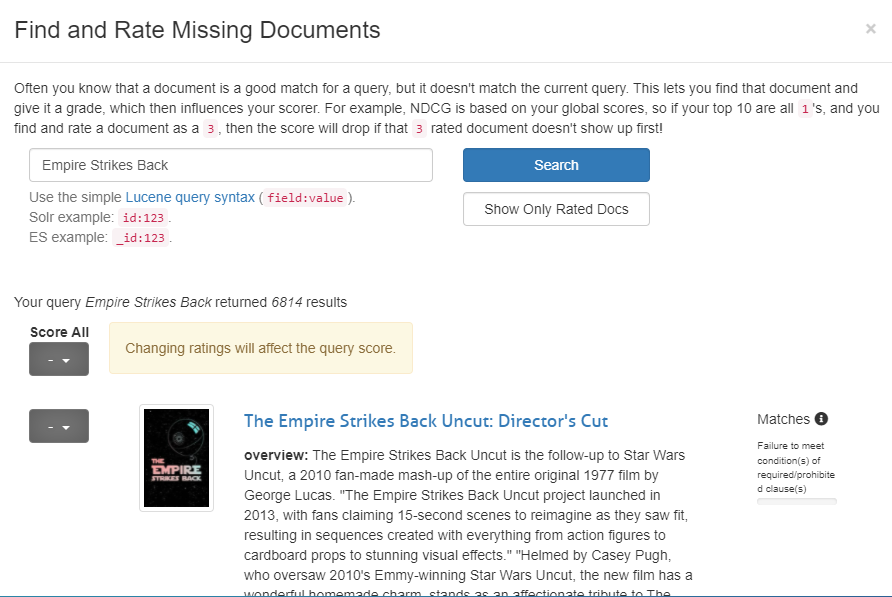
Often, when iterating on a query to improve search relevance, we will encounter search results that our human raters have not given judgments. This is because our revised queries are bringing back documents that were not in the original searches. This is normal and expected. However, what if we know a document is relevant for a query but it is not being returned? We can use the find and rate missing documents feature.
Click the Missing Documents link to bring up the window. In this window we can search for a specific document (movie) to judge. In the search query box enter "Empire Strikes Back" and click Search. The first listing should be "The Empire Strikes Back Uncut: Director's Cut." We can now give a judgment to this result.
Viewing the Query Tuning History
As we iterate, it can be helpful to see what we have previously tried. The History tab will show the history of our previous queries.
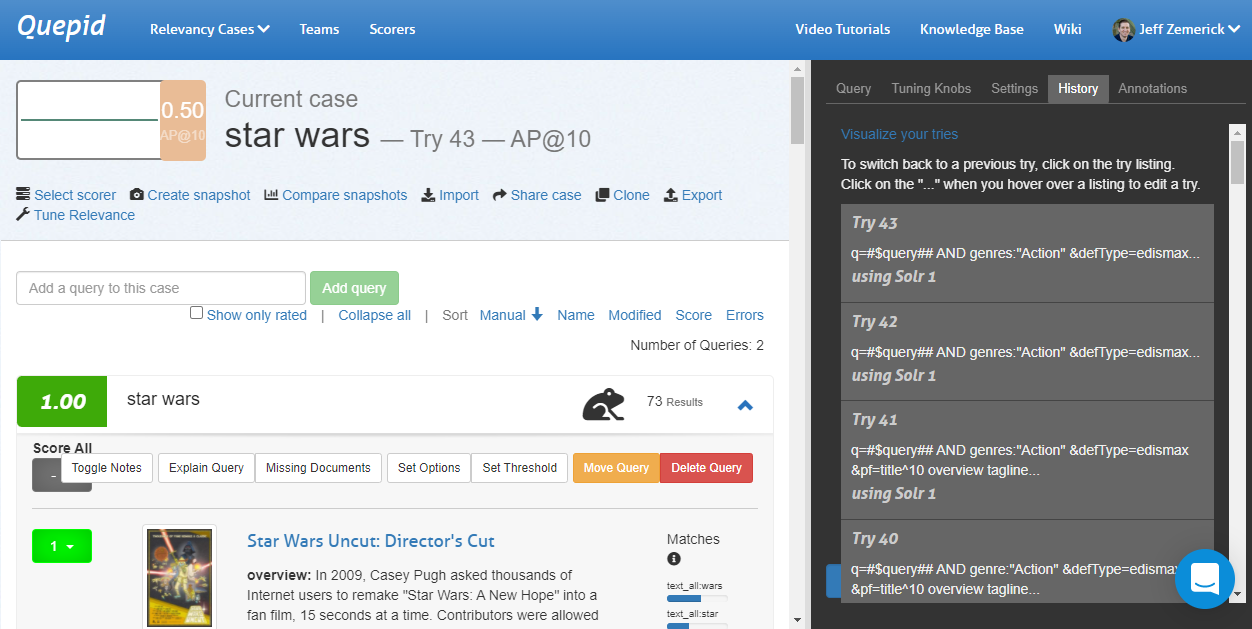
History Link
Under the History tab at the top you will see a Visualize your tries link. Clicking this link opens a new window that shows a visual representation of your query history. Hover over each node to see the query that was run. Clicking on a node in the visualization will re-run that query.
The history link visualization provides a powerful way to examine your previous queries. As part of Quepid's goal to reduce experiment iteration time, the history link visualization can help you reduce the iteration time by showing a comprehensive look at your past iterations and helping you to not inadvertently duplicate any previous iterations.

Conclusion
Quepid has a lot of great features for search relevance engineers. The ability to view rated search results and tune the search relevancy through direct access to the query provides engineers capabilities for iterating and experimenting. More advanced search relevance engineers will likely want to explore Quepid's documentation for more in-depth details on Quepid's capabilities.
Quepid for Operations
In this tutorial you will learn how to deploy and configure Quepid on your own infrastructure along with some of the other functionalities of Quepid such as team management and managing queries.
Deploying Quepid
Quepid can be deployed on your own hardware using Docker. The Installation Guide will walk you through the deployment and creating users.
Teams
Teams in Quepid allow you to group your users based on their roles and cases. For example, you can create teams for your raters and your search relevance engineers as shown in the screenshot below. Case can be assigned to teams to provide access to your company's search team members. You can also make custom scorers available to a team. Using Quepid's Teams helps keep your search relevancy efforts organized. To access the Teams, click the Teams menu at the top of any page.
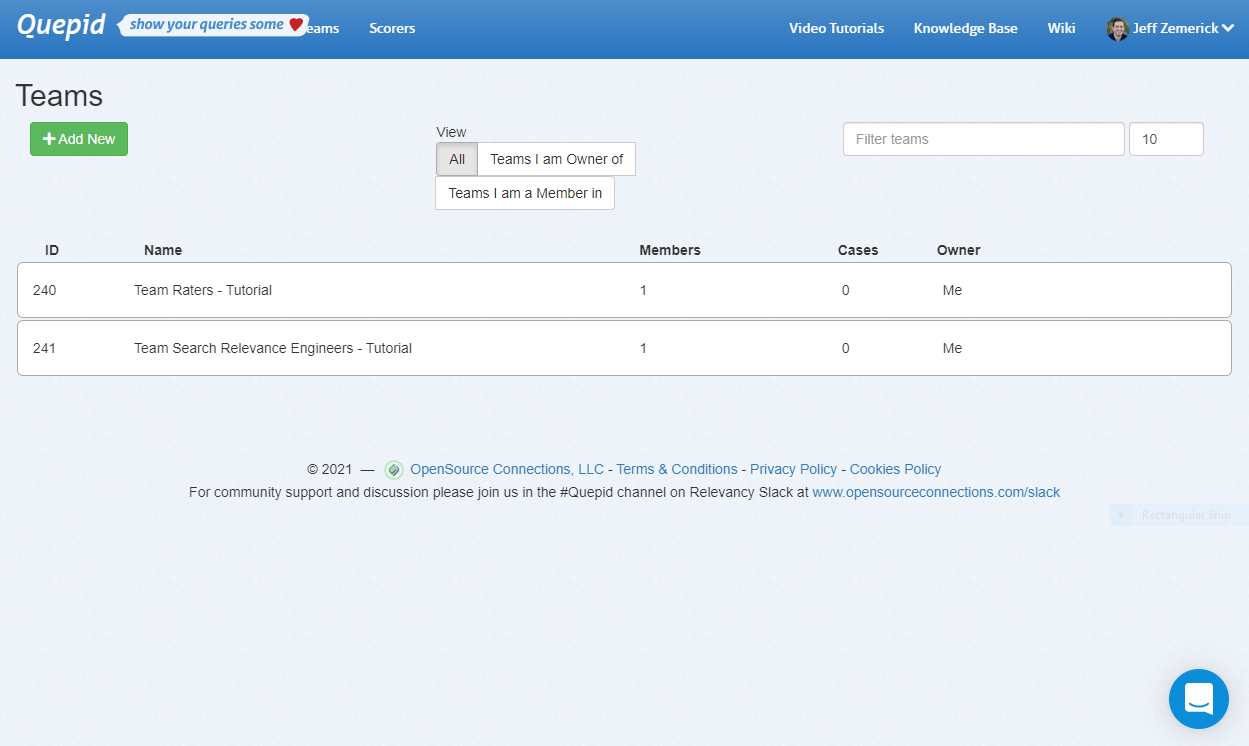
To create a team, click the Add New button. You will be asked to give the new team a name. All team names must be unique in each deployment of Quepid.
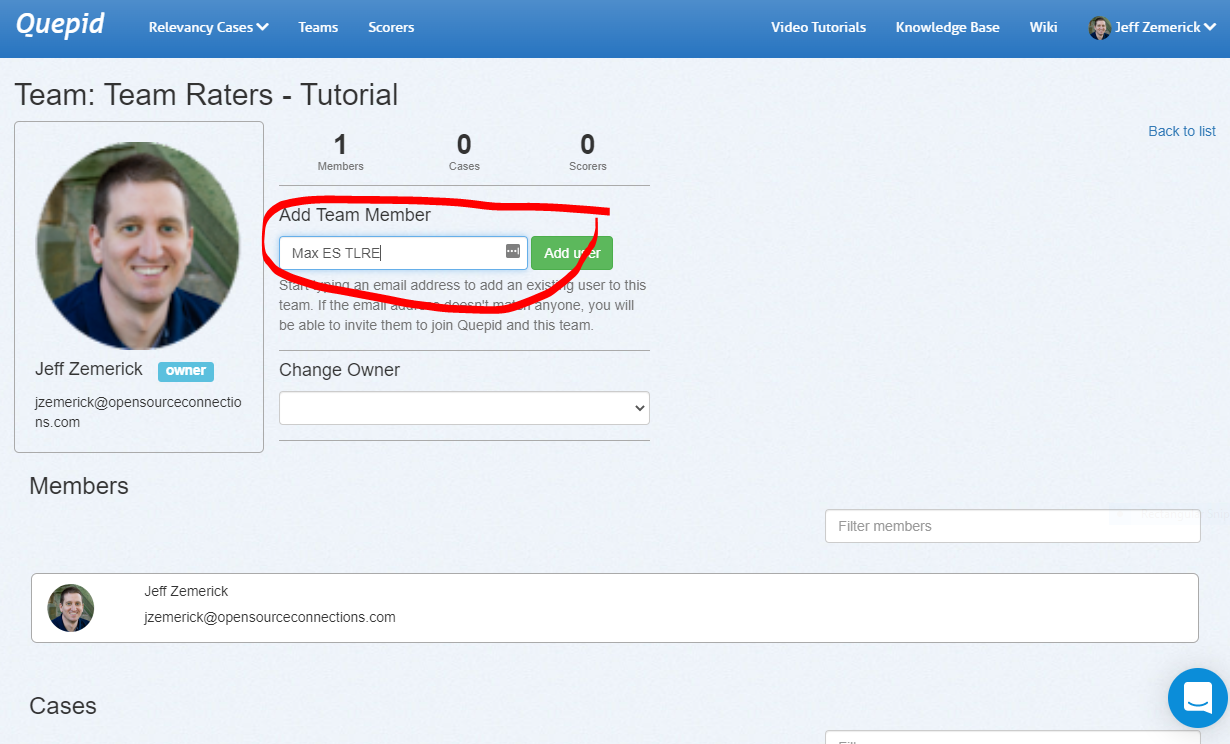
Creating a Team
To add users to a team, click the name of the desired team to open the team detail page. On this page, enter the user's email address or display name and click the Add User button. If the user you enter does not yet have a Quepid account and Quepid is configured for email sending they will receive an email inviting them to Quepid. If Quepid's email configuration has not been configured, you will be provided an invite URL you can copy and paste and share with the user you want to invite. The user can use the invite URL to create their account and join the team. When you are finished adding users to the team, click the Back to list link.
What does the email invite look like?
When you invite a user that does not already have an account in Quepid, the user will receive an email inviting them to create an account on Quepid. An example of that invitation email is below.
Hello invited.user@gmail.com
John Smith has invited you to join their team on Quepid at https://app.quepid.com/, you can accept it through the link below. https://app.quepid.com/users/invitation/accept?invitation_token=LUkf6k4pa_1234mUiGj6
If you don't want to accept the invitation, please ignore this email. Your account won't be created until you access the link above and set your password.
Team Owner
The team owner is the person who created a team. Any member of a team can invite another user to the team. The team owner can be changed by opening the team and selecting another member of the team. The user selected will become the new owner of the team.
Adding a Case to a Team
To add a case to a team, open the case. Click the Share case link. You will be shown a window and asked to select a team. Click the desired team to share the case with that team.

Adding a Scorer to a Team
Along with cases, scorers can also be associated with teams. To add a custom scorer to a team, click the Scorers link at the top of any page. On the Scorers page, click the Custom tab to show the scorers that you have created. For the scorer you want to share with a team, click the Share link. A Share Scorer window will be shown and you can click which team to share the scorer.

Managing your Query Set
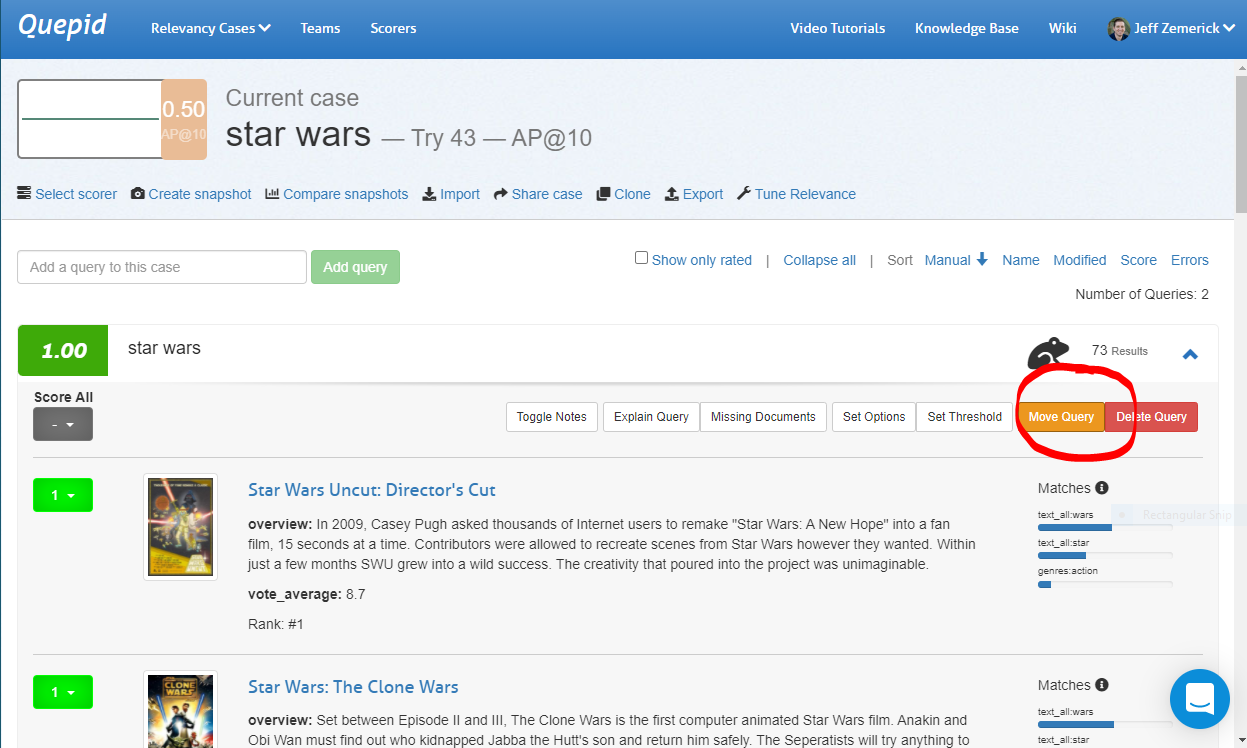
Moving a Query
A query and its associated search results and ratings can be moved to another case. To move a query, expand the query by clicking the query terms. Next, click the Move Query button. A window will be shown asking you to select the new case for the query. Click the desired case to move the query.
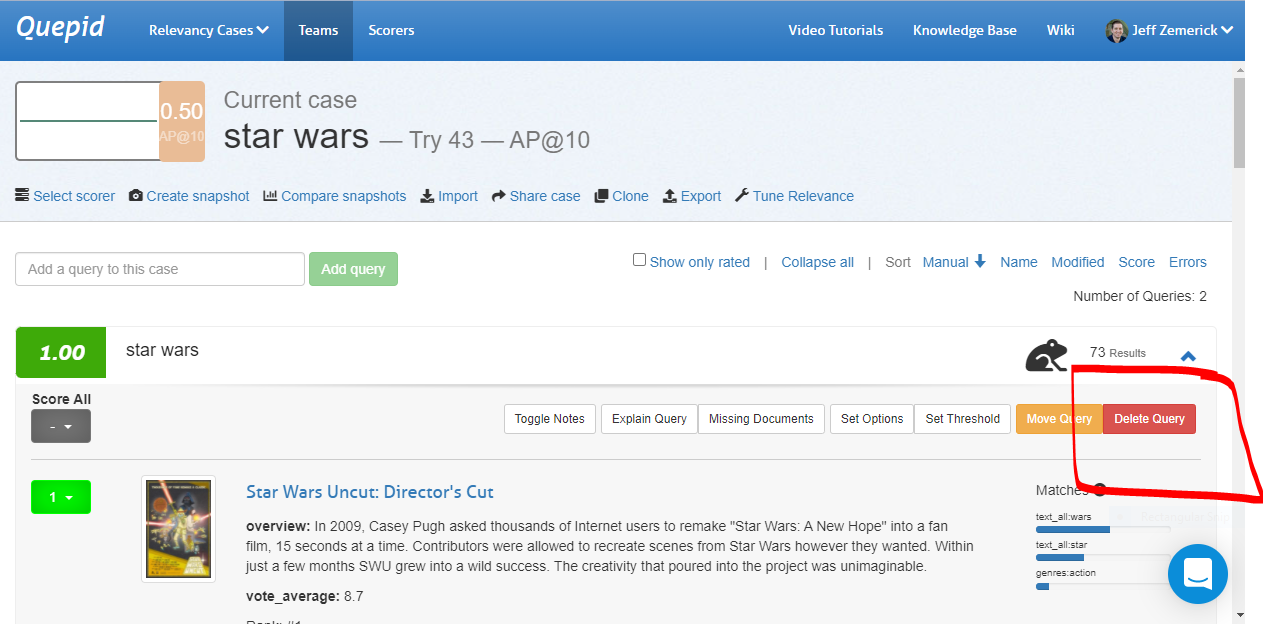
Deleting a Query
There may be times in which you want to delete a query from your case. Perhaps the query is no longer needed and can be removed. To delete a query expand the query by clicking the query terms and click the Delete Query button. You will be prompted to confirm the deletion of the query.
Importing and Exporting Ratings
Ratings can be imported into existing queries and cases. You may want to import ratings if you have previously rated search results in another application other than Quepid. Ratings can be imported from CSV, Rated Ranking Evaluator, or in the common Learning To Rank (LTR) format. To import ratings, click the Import link. A window will be shown to begin the import.
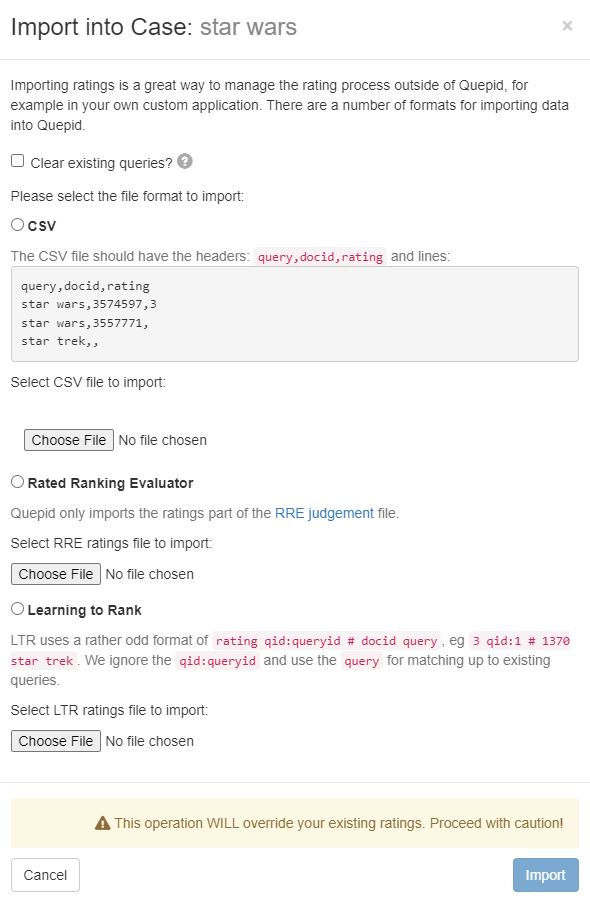
First, importing ratings can clear your existing queries. If all of your work has been done outside of Quepid and you are now bringing your work into Quepid you can select the Clear existing queries option to remove all queries from Quepid prior to the import. Please be sure you want to do this because all queries in Quepid will be lost.
Next, select the format of your ratings to import. Choose either CSV, Rated Ranking Evaluator, or Learning to Rank.
Importing from CSV
When choosing CSV, a sample of the expected data is shown. The data should be formatted as
query,docid,rating. Once your CSV file is appropriately formatted, click the
Choose File button to upload the file and begin the import.
Importing from RRE Export
When importing from Rated Ranking Evaluator (RRE), simply click the Choose File button to select and upload your ratings previously exported from RRE.
Importing from LTR Training File
To import ratings from an LTR training file, click the Choose File button to select and
upload an LTR training file. The format of file is expected to be
rating qid:queryid # docid query. The qid:queryid value is ignored in
favor of the query value and is the value used in Quepid.
Conclusion
Quepid provides a lot of flexibility around managing "cases" and "queries". "Queries" can be moved between "cases", "queries" can be imported from external sources, and the "teams" feature allows for organizing your search relevance efforts around people, "cases", and "scorers".